What telescope should you buy? What features should you consider and what do they mean? It can be frustrating, the technical jargon, as a beginner looking to buy astronomy gear. The following is to help you get a handle on the telescope reviews and product descriptions when choosing the right telescope to buy for you.

What telescope should I buy? The telescope to buy depends on what you want from it, and your budget. Look at one with decent telescopic power for serious-planet viewing, portability for taking on excursions, and easy-to-use features for a children’s gift.
As Terrence Dickinson says in his practical guide to stargazing, “There is no such thing as the perfect telescope for everyone”. So let’s look at the options.
Telescope buying guide
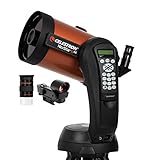
How do I look for a good astronomical telescope? If you’re wanting portability with telescopic power, consider a Celestron NexStar 6 SE, as a good portable telescope option and one for viewing planets anywhere.

NexStar 6SE Telescope
Check it out at Amazon (affiliate link)
For what differentiates backyard telescopes: the types of telescopes, but also the different light gathering, magnifying, and resolving power of the instruments — you’ll find a ton of information below. You’ll also find a list of technical terms farther down to help with the jargon you’ll come across while comparing the specs of telescopes on the market.
Light gathering power
The main function of a telescope is to gather and concentrate light toward your eye so you get a better view of your target object. You may not know this, but light-gathering power comes before magnification in terms of telescopic power, even though magnification is mentioned more often.
The size of the aperture determines the amount of light gathering, the larger the aperture, the brighter the image you receive. You get to appreciate this when viewing objects that are distant and faint.
You see, the brightness of the image relies on light gathering, and one of the main features to consider when buying a telescope is the aperture size (the diameter of the primary light-gathering lens or mirror). The sharpness and brightness of the view improve with size.
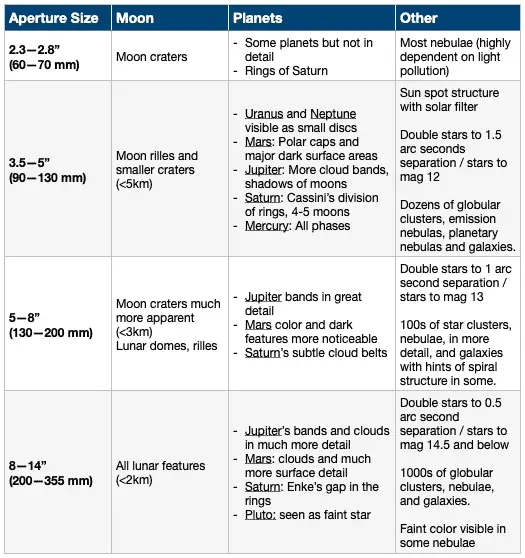
Aperture size Quick Reference: what you can see with a home telescope
The following is a guide only. What you see of the night sky objects will depend not only on your telescope but also on the specs of the eyepiece. Just be aware that, in what you see through a home telescope, anything above 8″ is prone to a phenomenon known as “poor seeing”, as Dickinson explains. Anything above 8″ is also bulky.

For a Newtonian reflector telescope: A decent look at the details of planets consider at least a 6-inch (150 mm) mirror (you should be able to see faint banding of Jupiter through the telescope). This size is the minimum for any decent astrophotography as well.
Though not useful for astrophotography, a 6″ Dobsonian is an inexpensive and suitable choice. I wrote about this in my article on the advantages and disadvantages of Dobsonian telescopes.
For a refractor telescope: Most children’s telescopes are refractors. Consider at least a 4-inch refractor for viewing details of planets. For a catadioptric (Maksutov-Cassegrain) telescope: For the details of planets look for at least a 3.5-inch catadioptric.
Resolving power
The resolving power of a telescope is how well it discerns two close objects. For example, where our naked eyes might see a binary star as one, the resolving power of a telescope shows an image of two separate stars.
The resolving power of a telescope increases with size of the aperture, or objective. As the size of the aperture increases so does the resolving power.
Magnifying power
Increasing magnification gives you more detailed views of objects in the night sky but at the same time narrows your view of the night sky. (More on getting the widest view in my article that explains the field of view). You can determine the telescope’s magnification using the calculator on my Tools page.
While telescope eyepieces play an important role in magnification, the outcome depends on the specs of your telescope. Your telescope will have minimum and maximum limits of magnification listed in the specifications. Otherwise, for good seeing conditions here’s the maximum magnification formula…Maximum magnification = Aperture (in inches) x 50.
Once again, the size of the aperture matters. So with a 6″ aperture, the max is theoretically 300x. Just be aware that atmospheric conditions can bring this threshold down to half that result. Instead of a multiple of 50, anywhere between 8 and 40 can apply under normal conditions. Check out my article on choosing eyepieces, which covers this, and find out how to use a Barlow lens to expand your eyepiece set for different magnifications.
Types of telescopes
The three main types of optical telescopes are reflectors, refractors, and catadioptrics. The main difference between them is the optics:
- Reflectors use mirrors (catoptrics)
- Refractors use lenses (dioptrics)
- Catadioptric combines lenses and mirrors
The Reflector Telescope
The reflector type (or reflecting telescope) uses mirrors, which have a shiny surface to gather light and then reflect the image. The Newtonian reflector type typically transmits 77–80% of the light collected.
In this, there is a mirror at the back where light is collected and concentrated onto a smaller mirror that redirects the light into the eyepiece. The main mirror has a parabolic surface and this removes spherical (or color) aberration as it focuses the light rays to a common focus point. What’s an aberration? That’s when different colors come into focus or there is blurring or distortion.
A Dobsonian (named after John Dobson) is a Newtonian telescope that has an alt-azimuth mount (moves around on two axes). It requires manual adjusting using finder charts and star maps. You might be thinking of buying a telescope under $200, but consider a Dobsonian, which, in terms of a beginner telescope, will offer you more bang for your buck in terms of light-gathering power.
The Refractor Telescope
The refractor (or refracting telescope) uses a series of lenses to capture light and reflect the image. They typically transmit 90% or more of the light they collect.
The benefits of refractors: Low maintenance and long-lasting. Cons: Spurious colors at times, such as the pale violet halo around bright stars, the limb of the Moon, and the planets.
Catadioptric Telescope
Maks and SCT fold the light path and have much shorter tubes than reflectors and refractors. They are compact. The catadioptric typically transmits 64-75% of the light collected. A Maksutov-Cassegrain (also known as Maks) is a catadioptric type that has a spherical mirror and a slightly negative meniscus lens (usually full-diameter).
Slightly less expensive, a Schmidt-Cassegrain (also known as SCTs) is also a catadioptric type. It uses a thin correcting lens (Schmidt), which is a spherical main mirror and another small mirror (no negative curvature) to concentrate the light through the eyepiece at the rear. They shouldn’t suffer color aberration. The SCTs are manufactured in much larger sizes also. This is a jack of all trades.
The advantage of Maks is that they don’t require collimation (alignment of the optical elements) and are fairly rugged. So, they are suited to being on the move. Maks are good for planet viewing and lunar observations. Cons: Suffer from aberration.
See my article exploring the benefits of catadioptric telescopes.
GoTos
These are high-tech and require some tinkering to set up, but with their onboard computer, they automatically take you to that object in the sky. You don’t need much knowledge of the sky with this telescope to see stars. Smartphones, tablets, and Wi-Fi feature in their use. Price-wise, expect to pay a tad more.
As a guide, you will pay the same price for a well-equipped GoTo as you would for a Dobsonian with an aperture 3x the aperture size of the GoTo.
Technical terms
When looking to buy a telescope, the following are terms you may come across in the specifications. It might help to know what these mean to feel less overwhelmed by any unfamiliar jargon.
Altazimuth
Alt-Azimuth is short for altitude and azimuth. The azimuth is the vertical axis (like a compass bearing) and the altitude is the horizontal axis (angle of elevation) of the telescope’s pointing direction.
Alt-azimuth mounts
This type of mount is less expensive and lighter than the EQ mount. It is a basic up-down and left-right operation. Alt-azimuth mounts allow for manual tracking of objects with the Earth’s rotation on a two-axis basis. It moves in azimuth (about a vertical axis) and in altitude (about a horizontal axis). Thus, not a simple following of a particular object in the sky. Altazimuth mounts are economical and simple to use and can result in a good cheap telescope.
The downside for these is that the non-computerized mounts need to be slightly moved every few minutes along both axes to adjust for the Earth’s rotation. This becomes more difficult with the increase in the size of magnification. They are not ideal for pointing at objects near the zenith and are not suited for astrophotography.
Aperture
The aperture is the diameter of the telescope’s primary light-gathering lens or mirror.
Barlow Lens
A concave lens that increases the eyepiece magnification. Not really a lens as such a Barlow goes inside the telescope’s focuser before the eyepiece. It immediately doubles (or triples) the magnification. There is a small loss of light, but the benefit is that this device can double the value of your eyepiece by two powers. If considering a Barlow in a set with eyepieces, avoid having eyepiece focal lengths that are multiples of one another because a 20 mm and a Barlow make a 10 mm eyepiece redundant. Consider “achromatic” and “multi-coated” specifications as options to include.
Equatorial mounts (EQ)
An equatorial mount is a single-axis mount that runs parallel to the Earth’s axis of rotation. The advantage is that there is only one axis to move when compensating for Earth’s rotation when focusing on celestial objects. This type is useful for astrophotography. The EQs are less portable and can be complicated because of awkward positions that you might find yourself in trying to comfortably access the eyepiece of the Newtonian telescope. The varying designs of EQs include the German Equatorial Mount or GEM and the Open Fork Mount.
Chromatic Aberration
This occurs due to different light wavelengths being refracted at slightly different angles. Also called ‘color fringing’ or ‘purple fringing’, it’s a failure of the lens to focus all colors to the same point. An aberration means abnormality or irregularity.
Finderscope
a low-magnification scope with a wider field that you use with the main scope to find an object in the sky.
Focal length (FL)
The focal length represents the distance between the point of refraction or reflection of light (the main mirror or lens) and the point of focus. In Newtonians and refractors, the FL matches the length of the tube. This contrasts with Maks and SCT, which fold the light path and have much shorter tubes.
Focal ratio (f/)
The focal ratio is the focal length divided by the aperture (in mm). This value is often marked near the eyepiece focuser. You’ll find telescopes from f/4 to f/8 in Newtonians, f/8 to f/15 in refractors (f/6 to f/9 apochromatic type), f/10 in SCTs, and F/7 to F16 in Maks.
The f/3 to f/5 types are geared for low power and are best for wide field or deep space photography, i.e. large faint objects like galaxies. The f/6 to f/10 types are geared for high power and are best for narrower field photography, e.g. planets, the moon, and binary stars.
Open Fork Mount (or Fork Mount)
This is an equatorial mount design with a two-pronged fork attachment. You’ll likely find this type of mount on Cassegrain optical systems, that is, the modern catadioptric reflecting telescopes (200 mm or larger diameter). The mount resembles an Altazimuth mount, with the fork sitting on a wedge so that the azimuth axis is tilted and aligned with Earth’s axis of rotation (Earth’s geographic pole). The advantages are cost, versatility, and ease of use. Unlike the GEMs, this design tracks objects continuously through the meridian.
German Equatorial Mount (GEM)
This is an equatorial mount design that has a primary structure shape of a ‘T’. This scope is balanced by a counterweight. The main advantage of a GEM is that you can easily swap telescopes, i.e. undo the mounting connections, remove one scope, and replace it with another. Their disadvantages are that they are heavier than other EQs because of the counterbalance and they often need to be “flipped” (a meridian flip) at some point to continue tracking to avoid the telescope hitting the mount.
Highest Useful Magnification
This is the highest visual power of a telescope achievable before the image becomes too dim to usefully observe. Usually 50 to 60 times the telescope’s aperture in inches (20 times in practical terms with atmospheric turbulence), or two times the aperture in millimeters (mm).
Lowest Useful Magnification
Three to four times per inch of the aperture, or 6 to 7 times the aperture in mm. The size that the image becomes before light is lost outside visual observing ability (means the pupil width of 6 mm for older adults and 7 mm for young adults). Thus, it is best to avoid an eyepiece that produces less than the lowest useful magnification of the telescope.
Limiting Stellar Magnitude (or Limiting Magnitude)
Star brightness is measured in magnitudes with the brightest stars seen by the naked eye having the lowest magnitude and the fainter ones having a higher magnitude. Limiting stellar magnitude is a measurement used to indicate the faintest celestial object or star you can observe with a telescope. So the higher the limiting stellar magnitude, the greater the expanse of stars that the telescope can detect. This factor is dependent on the aperture size. Compare a relatively large aperture of 8″ where you can see a star of magnitude 13 to 14 with that of a small 3″ that has a limiting stellar magnitude of 9 to 11 (see my article covering what magnitude stars you can see with your telescope).
Moon Filter
This is a filter that is placed on the base of eyepieces to reduce glare and show more surface detail.
Star Diagonal Mirror or Prism
This accessory adds comfort when viewing from a direction that is at right angles to the usual eyepiece axis.
Final thoughts
If you looking for the best telescope for beginners and are still wondering: what is the best telescope to buy? Consider a telescope (or even a good set of binoculars) that’s simple and easy to set up. One like this is much better than any sophisticated type sitting, collecting dust, in the closet, or on the shelf. So, let’s say it’s the one that gets used and gives the best views for the money.
Info sources
- NightWatch, a Practical Guide to Viewing the Universe by Terence Dickinson (available at Amazon – affiliate link). This book contains sky charts and has a spring binding and so is practical for use on location.
- Astronomy Australia Year Guide to the Night Sky (affiliate link) by Wallace, Dawes, and Northfield includes all sky maps and much more information for stargazing down under
